Announcement

Collapse
No announcement yet.

Water in headlight unit

Collapse
X
 
  • Filter
  • Time
  • Show
Clear All
new posts

  • Water in headlight unit

    Hello all!

    A few months ago I noticed water building up inside my one of my headline units. I can't see any physical cracks on the lens and haven't changed any bulbs recently. I have checked the three covers where you replace the bulbs and they are all closed.

    Has anyone else had this before? Or know what to do? It seems to be more at the top of the unit, though I'm not sure if it's just the water trying to evaporate.

    The car is a 2013 pre-facelift.

    Discover the magic of the internet at Imgur, a community powered entertainment destination. Lift your spirits with funny jokes, trending memes, entertaining gifs, inspiring stories, viral videos, and so much more from users like murrell89.


    Thanks and Happy New Year!

  • #2
    try some silica gel pouches in headlight,after drying it out
    ​2015 Sri vx line nav BiTurbo . Sri heated leather.5500k AFL . Vx line 20s,8inch LCD dash .FLEXride.Reverse cam.Irmscher grill.235hp and 480 torqs.30mm lowering springs.20mm H&R spacers all round. Mtec drilled discs on rear,VXR 355mm drilled on front,with Brembo 4 pot calipers. Auto wipers .VX puddle lights.Carbon effect black roof wrap.Irmscher roof spoiler.Irmscher side skirts.

    Comment


    • #3
      strangely enough i am having the same issue with my drivers side unit water in the top, i have changed bulbs recently in both however its only the drivers one that has large drops of water built up. Hair dryer would work, i live in a 2nd floor apartment so my problem is electric, so i am trying the silca gel for now. i put my main beam on at work the other day for 10 minutes while just tappin the outer case of the light to move the water beads down and the heat from that started to dry the light out.

      Your picture is a carbon copy of my light and water issue

      Comment


      • #4
        Had it on couple Mercs one at 3 days old and it seems to be an issue with modern lights, I think its due to much less heat being generated as when they had halogen the heat would dry any damp air instantly.
        Best removing one of the covers on back while it drys out allowing moisture to evaporate but make sure you put it back before it rains or car gets washed.

        Comment


        • #5


          Happy New Year.

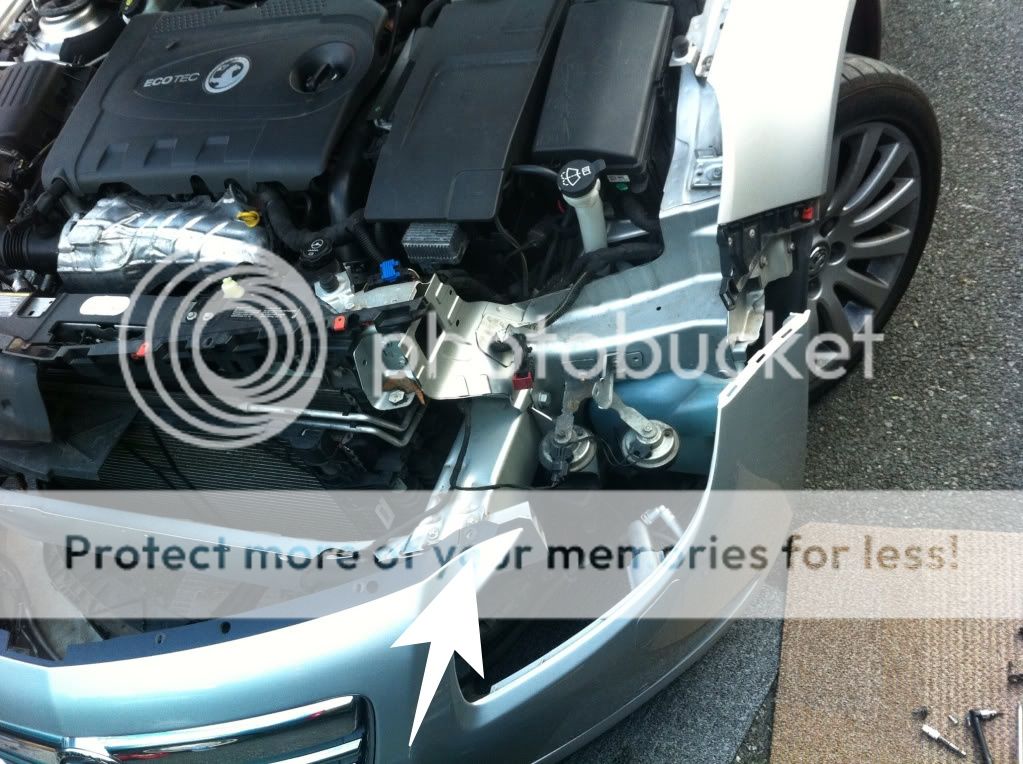
          Have a look at the picture, you'll see the arrow, the corner of the bumper is attached to the head lamp.
          Remove the screw and have a look at the top of the head lamp where the top of the bumper was attached.
          If you have a crack there, that's where the water gets in to the head lamp. If there is no crack , then the problem is somewhere ells.
          But that's where I found a crack on my head lamp.

          Comment


          • #6
            Originally posted by Roman14 View Post


            Happy New Year.

            Have a look at the picture, you'll see the arrow, the corner of the bumper is attached to the head lamp.
            Remove the screw and have a look at the top of the head lamp where the top of the bumper was attached.
            If you have a crack there, that's where the water gets in to the head lamp. If there is no crack , then the problem is somewhere ells.
            But that's where I found a crack on my head lamp.
            cool i will look into that on mine

            Comment


            • #7
              Check indicator bulb holder and bulb cover below it.I've got this problem I used some Vaseline to seal it for now see how it goes

              Comment


              • #8
                Take the headlight out and take all bulbs out of the unit.
                Get a hair dryer or better a heat gun and carefully heat the unit up, blowing hot air into the bulb holes and across the face of the unit.
                Be very careful moving the heat gun/hair dryer all the time so as not to melt the plastic.
                Eventually (and this could take a while depending on the amount of condensation in the unit) the unit will dry out.
                Then allow the unit to fully cool.
                Buy or have a look through your old shoe boxes for silica gel sachets, drop a few of these into the unit, obviously don't drop it into the space where the bulb goes, there is usally other spaces between the clear front and the back that these can be dropped in to.
                https://www.ebay.co.uk/itm/Silica-Ge...frcectupt=true
                And that's it, the silica will absorb any moisture that is in the lamp unit.
                I've fixed God knows how many units like this, including the rear lamp on my current Insignia.

                Comment


                • #9
                  Apologies in resurrecting an old thread but I have started to get quite bad condensation in my near side headlight. Has anyone got any instructions on how I can remove the headlight?
                  Insignia Elite Nav 2ltr SIDI Turbo 250PS, Pearlescent Emerald Green, VX-Line Interior, VX-Line Exterior Styling Kit, Premium Brandy Nappa Sports Leather, 20" Elite Multi Spoke Alloy Wheels, 8" Digital Drivers Display, Bose Premium Audio System, Front Camera Pack, Rear View Camera, Adaptive Cruise Control, Advanced Park Assist, Rear Privacy Glass, Keyless Entry & Start, Tyre Pressure Monitoring System, Factory Fitted Towbar

                  Comment


                  • #10
                    0011728 Replacing Xenon HID Headlight Ballast on 2011 Vauxhall Insignia without removing complete bumper. - YouTube,or remove bumper and splashgaurd also.
                    Insignia Elite 16T,Royal Blue non Nav. + added,
                    Heko Wind Deflectors,Alloy Pedal Covers.Led full Interior,Polished Alloy Door Pins,Osram Diadem Opel Rear indicator Bulbs,Led Reverse Light Upgrade,Gear Surround Red Leds,Led reg plate lights,Nighteye Fog lamp Bulbs,Osram Night Breaker Laser Cornering Bulbs,Rear Sunblinds,Nextbase 522GW front/rear window cam,upgraded front speakers,SS Exhaust,6000k Xenon Bulbs,Thinkdiag Diagnostic Tool

                    Comment


                    • #11
                      Yeah I saw that Howy but mines a facelift.
                      Insignia Elite Nav 2ltr SIDI Turbo 250PS, Pearlescent Emerald Green, VX-Line Interior, VX-Line Exterior Styling Kit, Premium Brandy Nappa Sports Leather, 20" Elite Multi Spoke Alloy Wheels, 8" Digital Drivers Display, Bose Premium Audio System, Front Camera Pack, Rear View Camera, Adaptive Cruise Control, Advanced Park Assist, Rear Privacy Glass, Keyless Entry & Start, Tyre Pressure Monitoring System, Factory Fitted Towbar

                      Comment


                      • #12
                        Can't be much of a differance?
                        Last edited by Howy; 07-02-2022, 09:02 PM.
                        Insignia Elite 16T,Royal Blue non Nav. + added,
                        Heko Wind Deflectors,Alloy Pedal Covers.Led full Interior,Polished Alloy Door Pins,Osram Diadem Opel Rear indicator Bulbs,Led Reverse Light Upgrade,Gear Surround Red Leds,Led reg plate lights,Nighteye Fog lamp Bulbs,Osram Night Breaker Laser Cornering Bulbs,Rear Sunblinds,Nextbase 522GW front/rear window cam,upgraded front speakers,SS Exhaust,6000k Xenon Bulbs,Thinkdiag Diagnostic Tool

                        Comment


                        • #13
                          I'm not mechanically minded at all thead
                          Insignia Elite Nav 2ltr SIDI Turbo 250PS, Pearlescent Emerald Green, VX-Line Interior, VX-Line Exterior Styling Kit, Premium Brandy Nappa Sports Leather, 20" Elite Multi Spoke Alloy Wheels, 8" Digital Drivers Display, Bose Premium Audio System, Front Camera Pack, Rear View Camera, Adaptive Cruise Control, Advanced Park Assist, Rear Privacy Glass, Keyless Entry & Start, Tyre Pressure Monitoring System, Factory Fitted Towbar

                          Comment


                          • #14
                            I tried all sorts to remove condensation in mine, just ended up buying a second hand one from a scrappy.

                            Comment


                            • #15
                              I had this in one of my headlights.

                              I just removed it, blasted a hairdryer into the back until dry and then sealed around all the edges. Bone dry ever since.

                              Comment

                              Working...
                              X